What does this article cover?
- What are field mappings?
- How to create a new mapping
- How do I delete a field mapping in Unito?
- Adjusting field values (the gear symbol)
- Grouped values vs. individually paired values
- Understanding Update Direction Limitations
- Why can't I change flow direction for some mappings?
- Why can't I map users?
What are field mappings?
Fields represent the details of each item in sync in your connected tools: title, description, assignee, attachment, etc.
Each field mapping, or pair of fields, represents a connection created by Unito that allows information to update in either direction or both. This is what we mean by 2-way sync. For example, you can decide that labels and tags with different values actually represent the same information (e.g., a "prod" label in one tool and a "production" tag in another).
The field mapping table is found in the fourth step of the flow builder:

Here's an example of a table of field mappings in Unito:

In this example, any field mappings with 2-way sync (represented by arrows moving in both directions) allow changes in either tool to update the other automatically.
How to create a new field mapping
When editing your fields in Unito, click + Add mapping to create a new pair of linked fields.
Then, Select a field for each tool.

Note: You can only have one pair of unassigned fields open at a time.
After choosing your first field, Unito will automatically narrow down the possible choices for the other connected field. Once you've chosen a pair of fields, you can (in most cases) change the update direction.
Restrictions
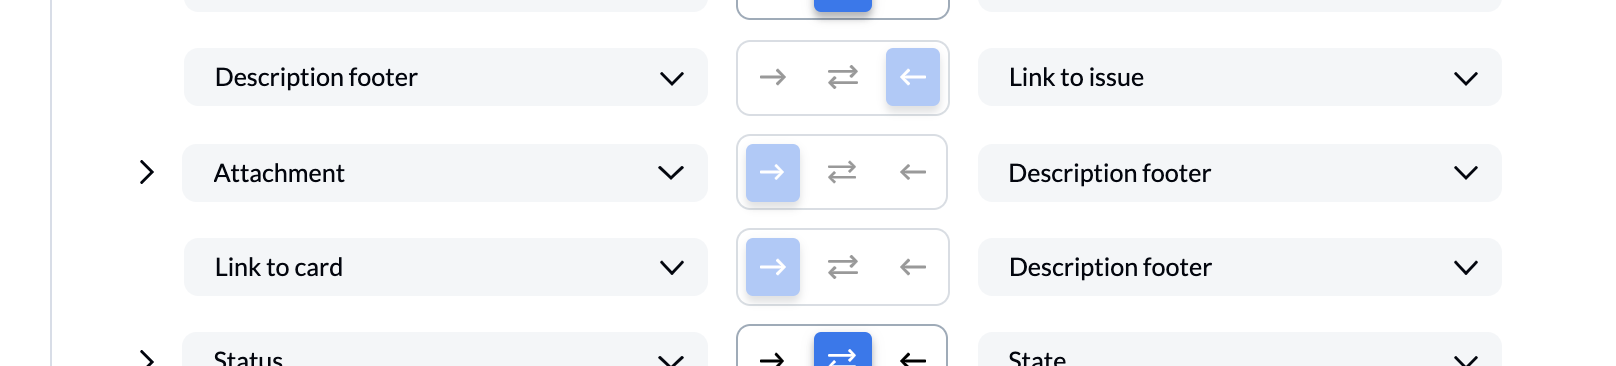
- Certain fields — like the description footer — can be mapped to multiple fields, while others can only be mapped once.
- Other fields can only be mapped in a single direction depending on the tool or the tool's API. For example, in some cases, attachments must be synced to the description footer of the other tool and not to another attachment field.
Choose an update direction
Each pair of fields has its own controls for update direction, much like flow direction. This controls the flow of information between linked fields.
The arrow buttons indicate if and how manual changes to one field will automatically update another.

- 1-way sync: Manual changes in one tool (the source) will update the other (the destination) automatically. The arrow points from the source to the destination.
- 2-way sync: Manual changes to either field will update the other automatically.
If a user in your workspace modified a destination field set to 1-way sync, the source would not change. But if the source was modified it any way, that change would overwrite the destination field.
How do I delete a field mapping in Unito?
To delete a field mapping in Unito, simply move your cursor over the mapping you want to remove and select the trash / bin icon on the right.

Note: Deleting a field mapping will not delete any of the associated data.
Ex.: Deleting a field mapping for a board name synced to the description footer (pictured above) won't delete any board names or details already synced to description footers. It will simply prevent your flow from syncing those fields in the future.
In this case, changes to any of these fields in either tool will update in the other tool, except for Number to Incident Number, and Link to Item which will only appear in the Description footer of the other tool but no changes to that description will affect the link.
Configuring field values (the gear symbol)
You can configure field mappings such as labels, tags, or other types of statuses and drop-down fields with more precision.
Click on the cog (or gear) icon beside the fields with a drop-down list associated to them. You'll then see additional options or values within that field mapping.
NOTE: An important example of this is any status field in your flow. Here's a guide to best practices for syncing statuses with Unito.
This is where you can decide how the different values of a drop-down field (usually statuses, states, or custom fields) in one tool correspond to a drop-down field in another.

In the example above, I've built a flow between two Trello boards and told Unito that my red label in one board should match with the red label in another.
Here's another example with a custom field that includes a drop-down menu:

There are a few things you can do here to customize this kind of mapping further:
-
Add a new pair: When you click on + Add more labels & labels you can add a new pair of mappings, and choose labels from both drop-downs, just like when you add a regular mapping.
-
Delete a pair: When you hover over a pair of mappings, a trash can will appear on the right, similar to main field mappings. Click on it to delete a mapping.
- Group new values: Use the "+" button to combine multiple values in one tool into a single value in the other. (e.g., "In Progress" and "In Review" in one tool become "Active" in the other.)
Grouped values vs. individually paired values
Within this sub-menu of field mappings, you can link values together. Values represent the different states of single or multi-select fields (e.g., types of status, priority, a team or department within your organization, stages of a deal, etc.).
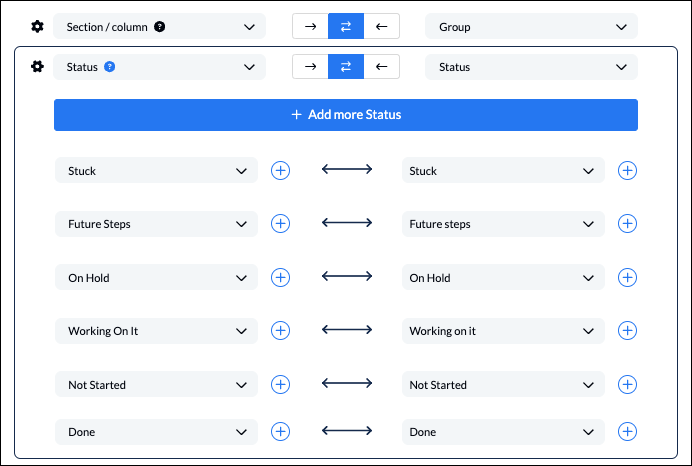
This is an example of values that have been paired up individually:
That means, in the example below, if the status is set to "stuck" in one tool, it will be assigned the "stuck" status in the other:
Here's an example of "grouped" values:
 In the above example, the item on the left can only be either incomplete or complete. So even if the issue status on the right changes through the various options listed above, it will only change from Incomplete to Complete in the task on the left if the right-hand issue is marked closed, rejected or resolved.
Understanding Update Direction Limitations
Sometimes, fields can only update in a single direction due to technical limitations in the tools themselves or a lack of a corresponding field in the destination tool. In those cases, a workaround is to sync those fields to the description footer.
Here are a few examples of field mappings that can only be one-way:
-
Any mappings including a description footer
-
Mappings that include the name of a board, project, or repository
-
A mapping including an issue number
The exact mappings affected by this will depend on the tool pairing you're syncing. To test this out, try to add a new mapping.
How to edit a mapping
You can change one of the synced fields in your mappings by clicking on a field name and seeing if there are alternative fields to replace it with. Once you save your flow, Unito will then update your flow according to the rules you've set.
 In this example, we could imagine someone originally synced Priority to Importance, but then later decided that Importance matched better with the Labels field.
Why can't I map users?
To map users between tools, they must exist in both tools already with the same email address. If you've done this and users, assignees, or members still aren't syncing, you may need to take a few additional steps to map users and assignees.
